
Appearance
Assessment
Lets discuss the different tabs in the assessment view.
Parcel
The Parcel tab allows the user to view and edit parcel info for this assessment. The user can switch between different tabs highlighted in red below to view and modify different aspects of the assessment.
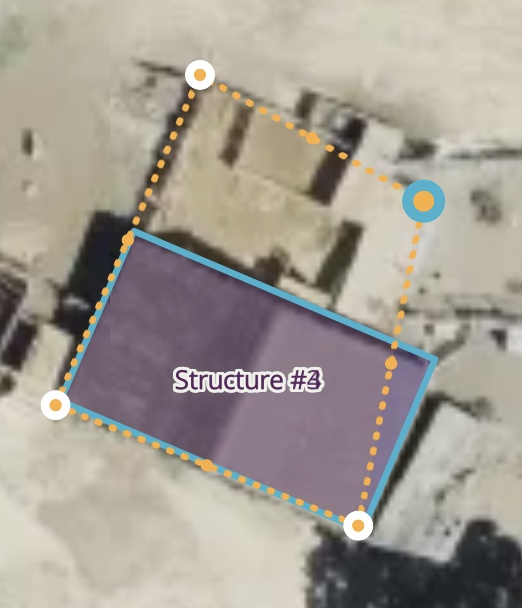
In the Structures section the user will find info pertaining to the property's different structures like sheds, secondary etc.
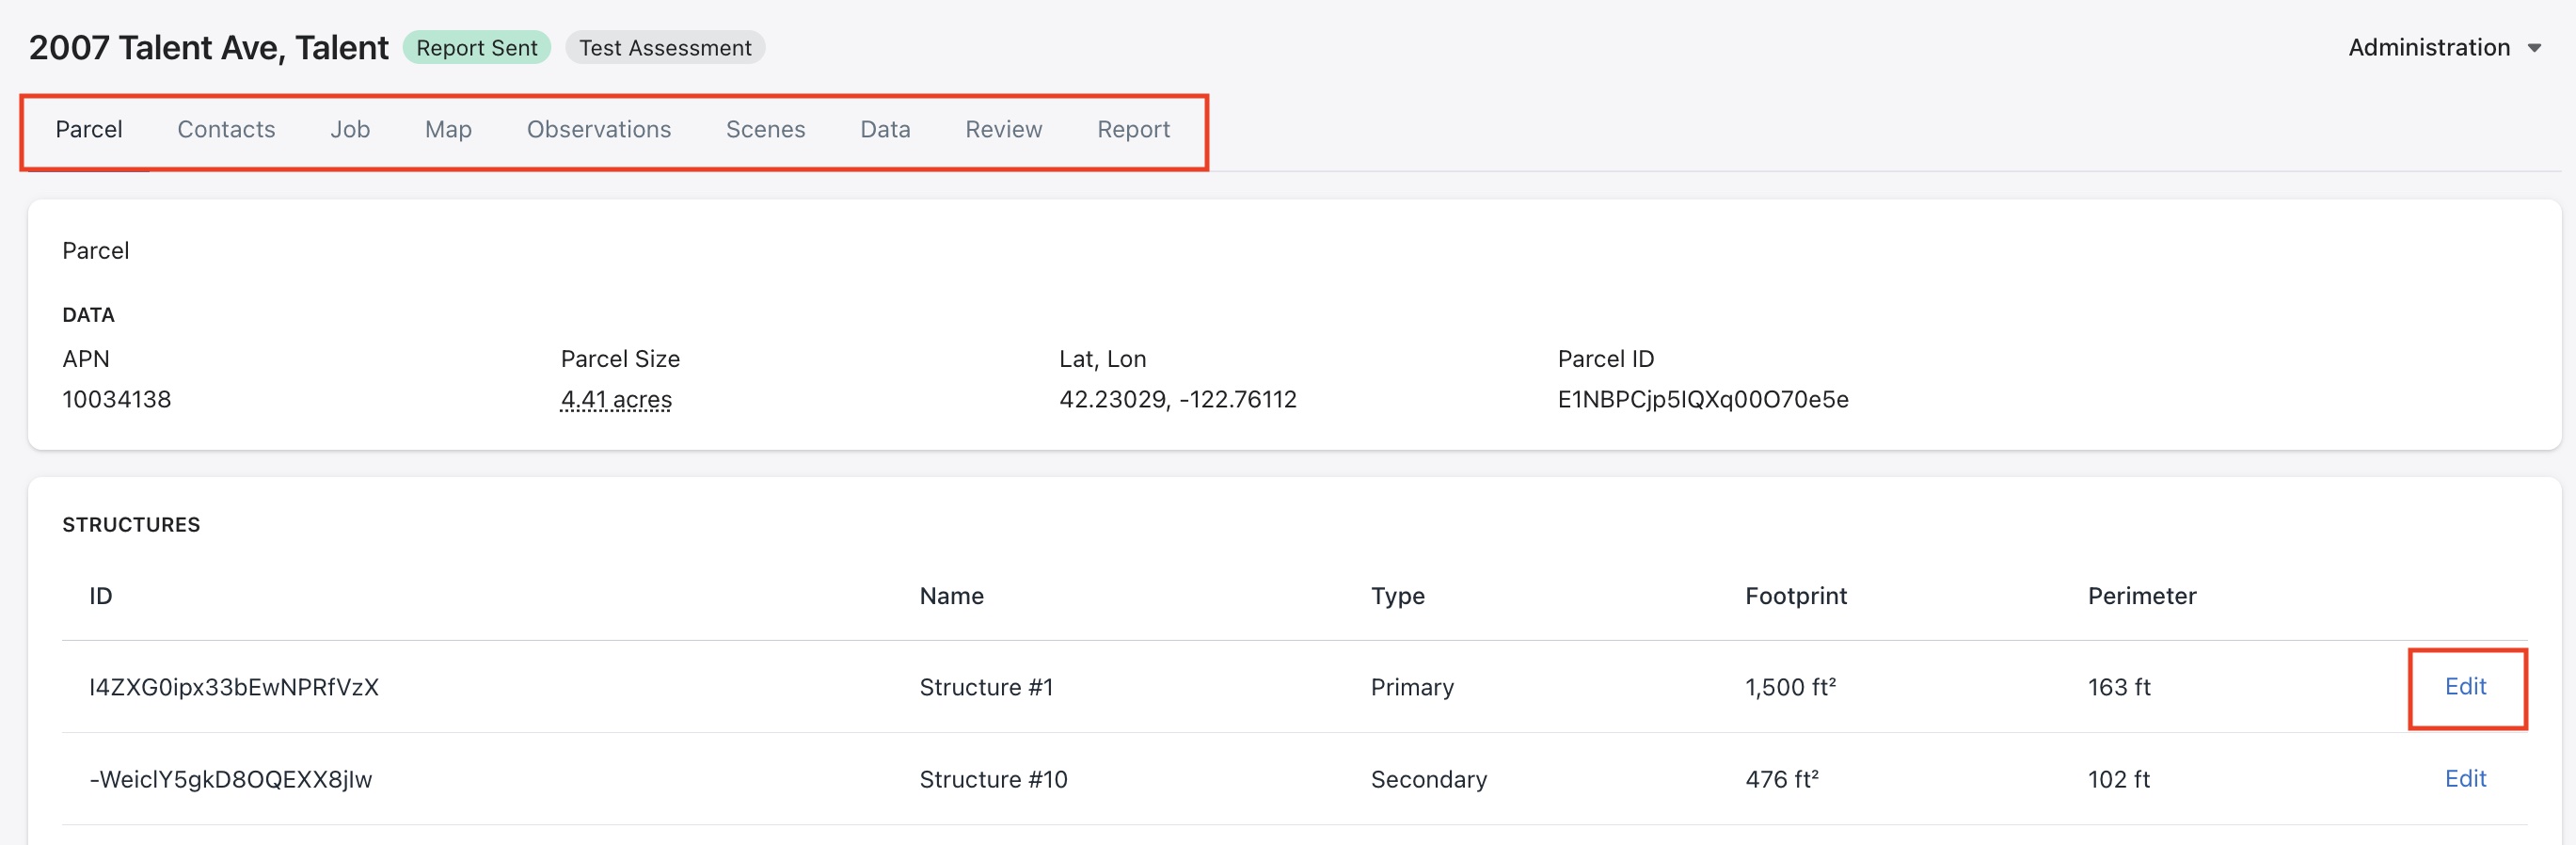
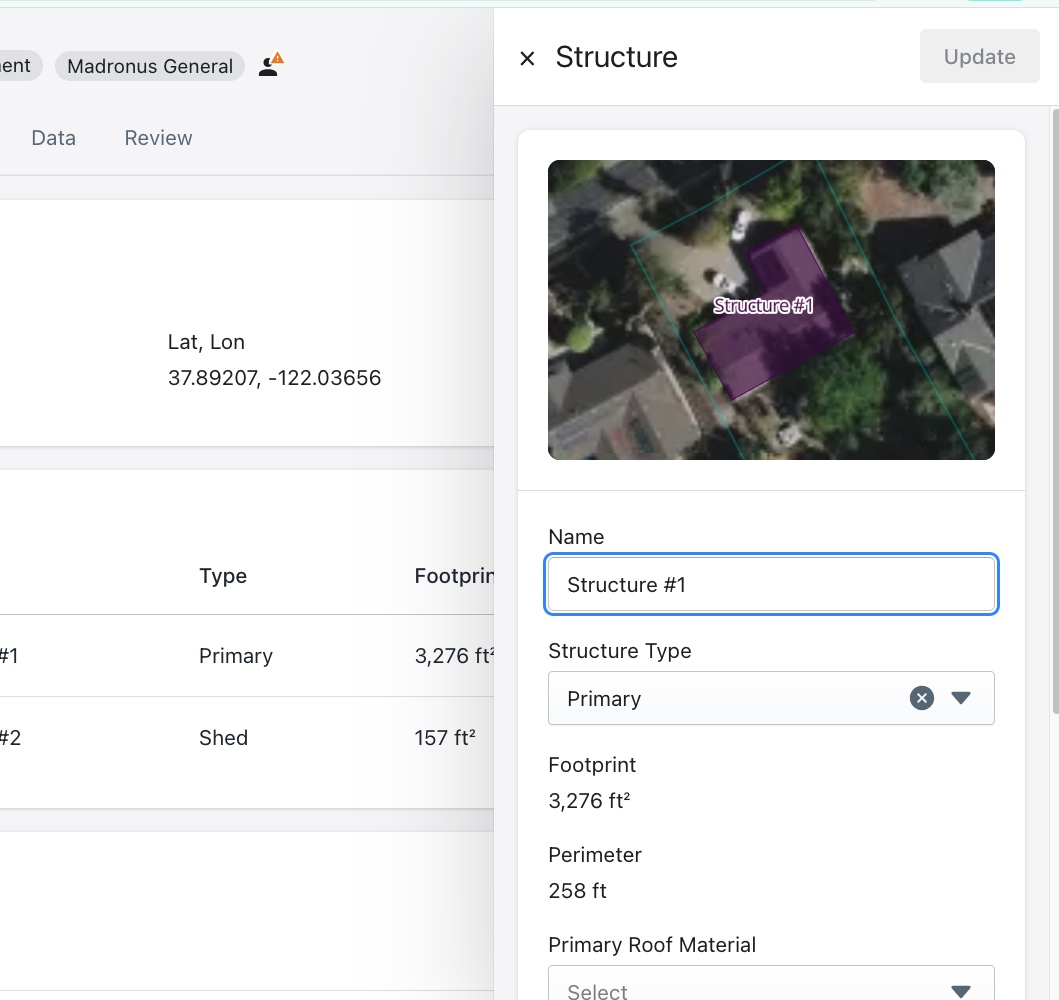
Click on Edit on one of the records to modify structure info -
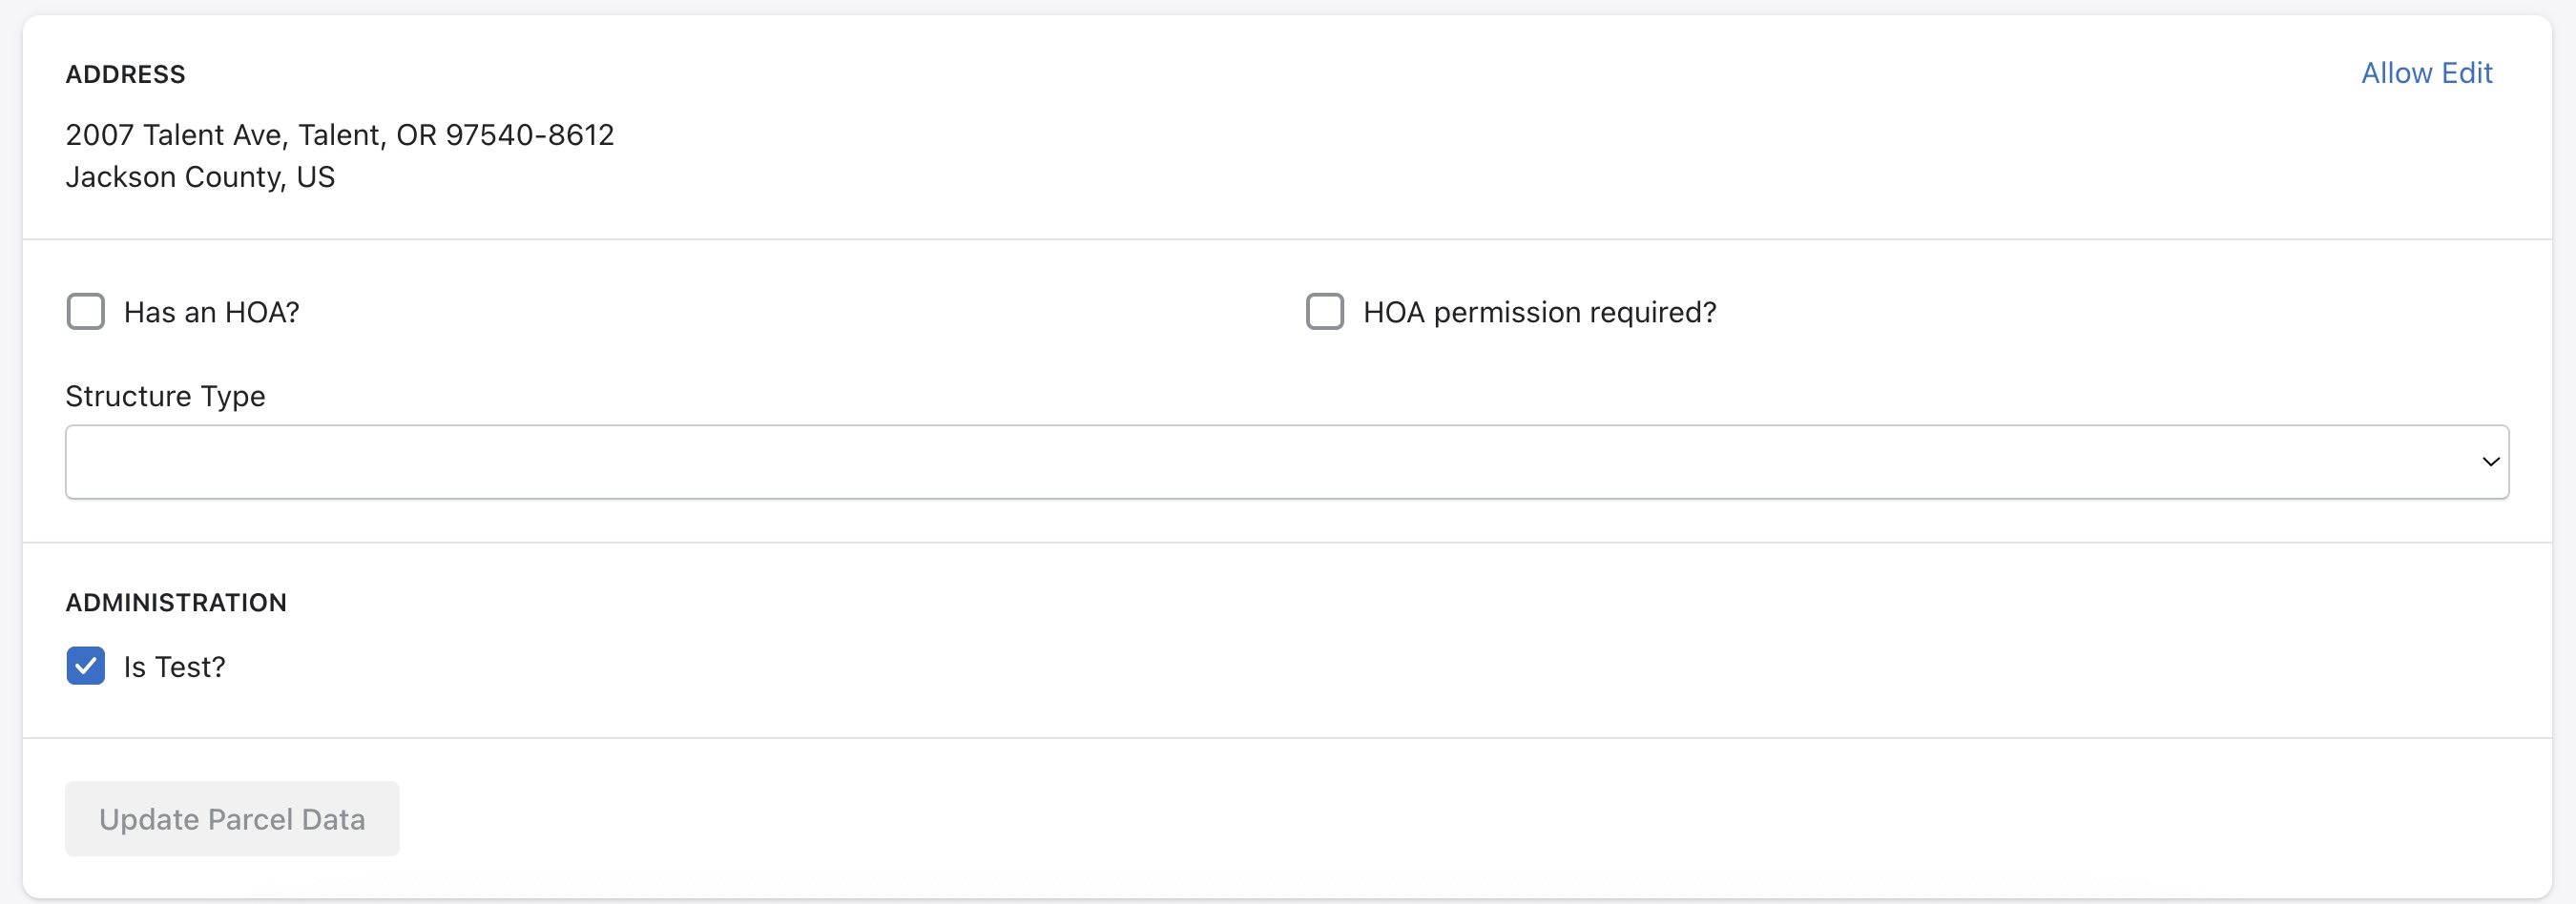
Some other parameters that can be reviewed on this tab are
- Address - Press Allow Edit to update address information
- Zoning info
Click on Update Parcel Data to save any changes.
Contacts
In the Contacts tab, the user can specify a primary contact for this property. Additional users related to this property can also be added in this section. Please note - only contacts will be able to receive report notifications.

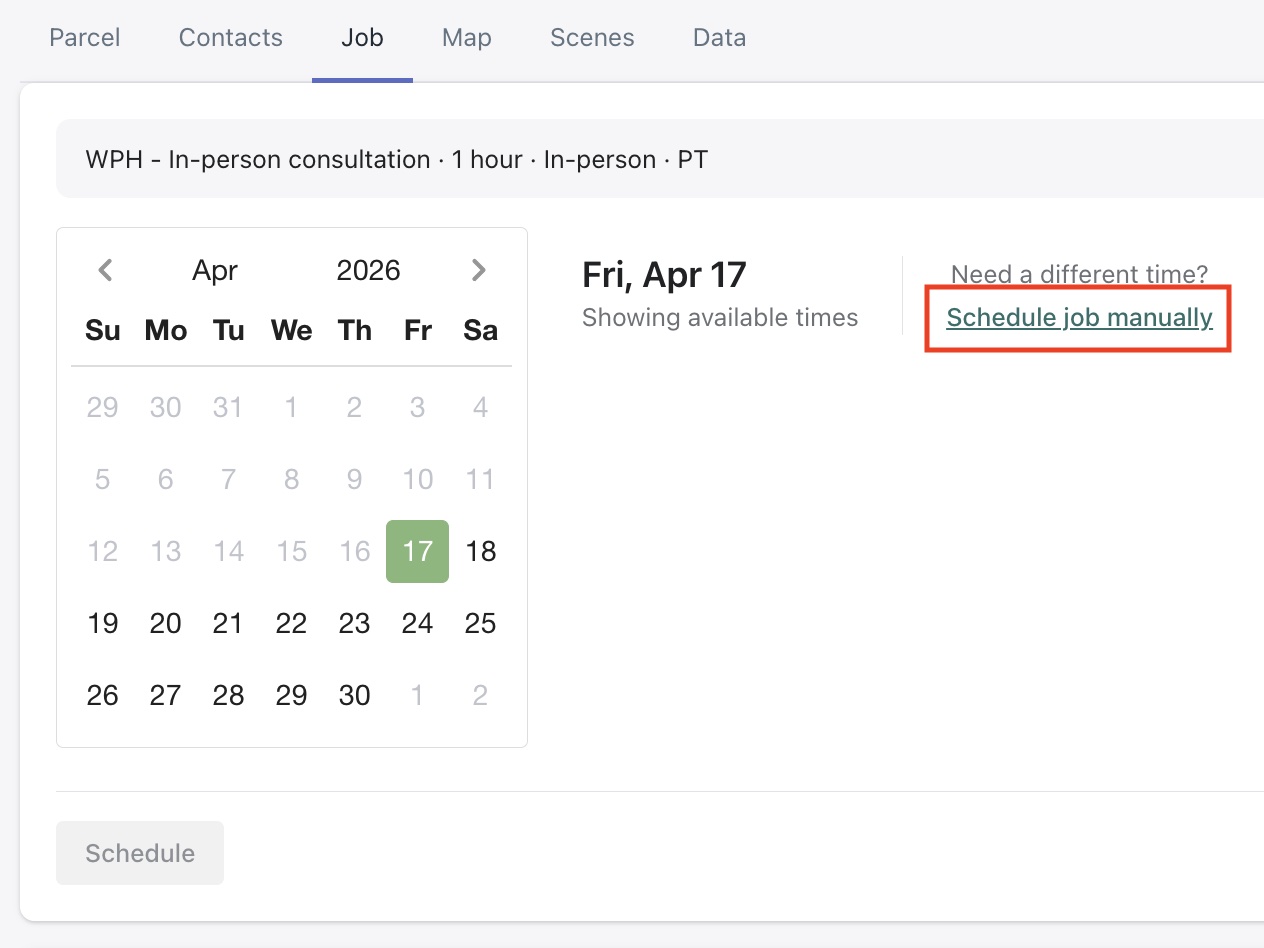
Job
The Job tab allows the user to view and manage scheduling options for this assessment.
If any previous scheduling info exists, it is displayed at the top of the page. The user is also able to update the Job type by expanding the section highlighted below -

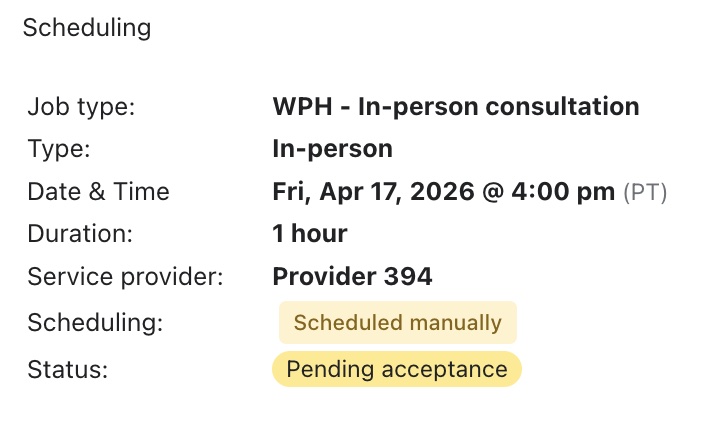
The user is able to update the following info in this section - Job type, duration required for this job, timezone and providers.
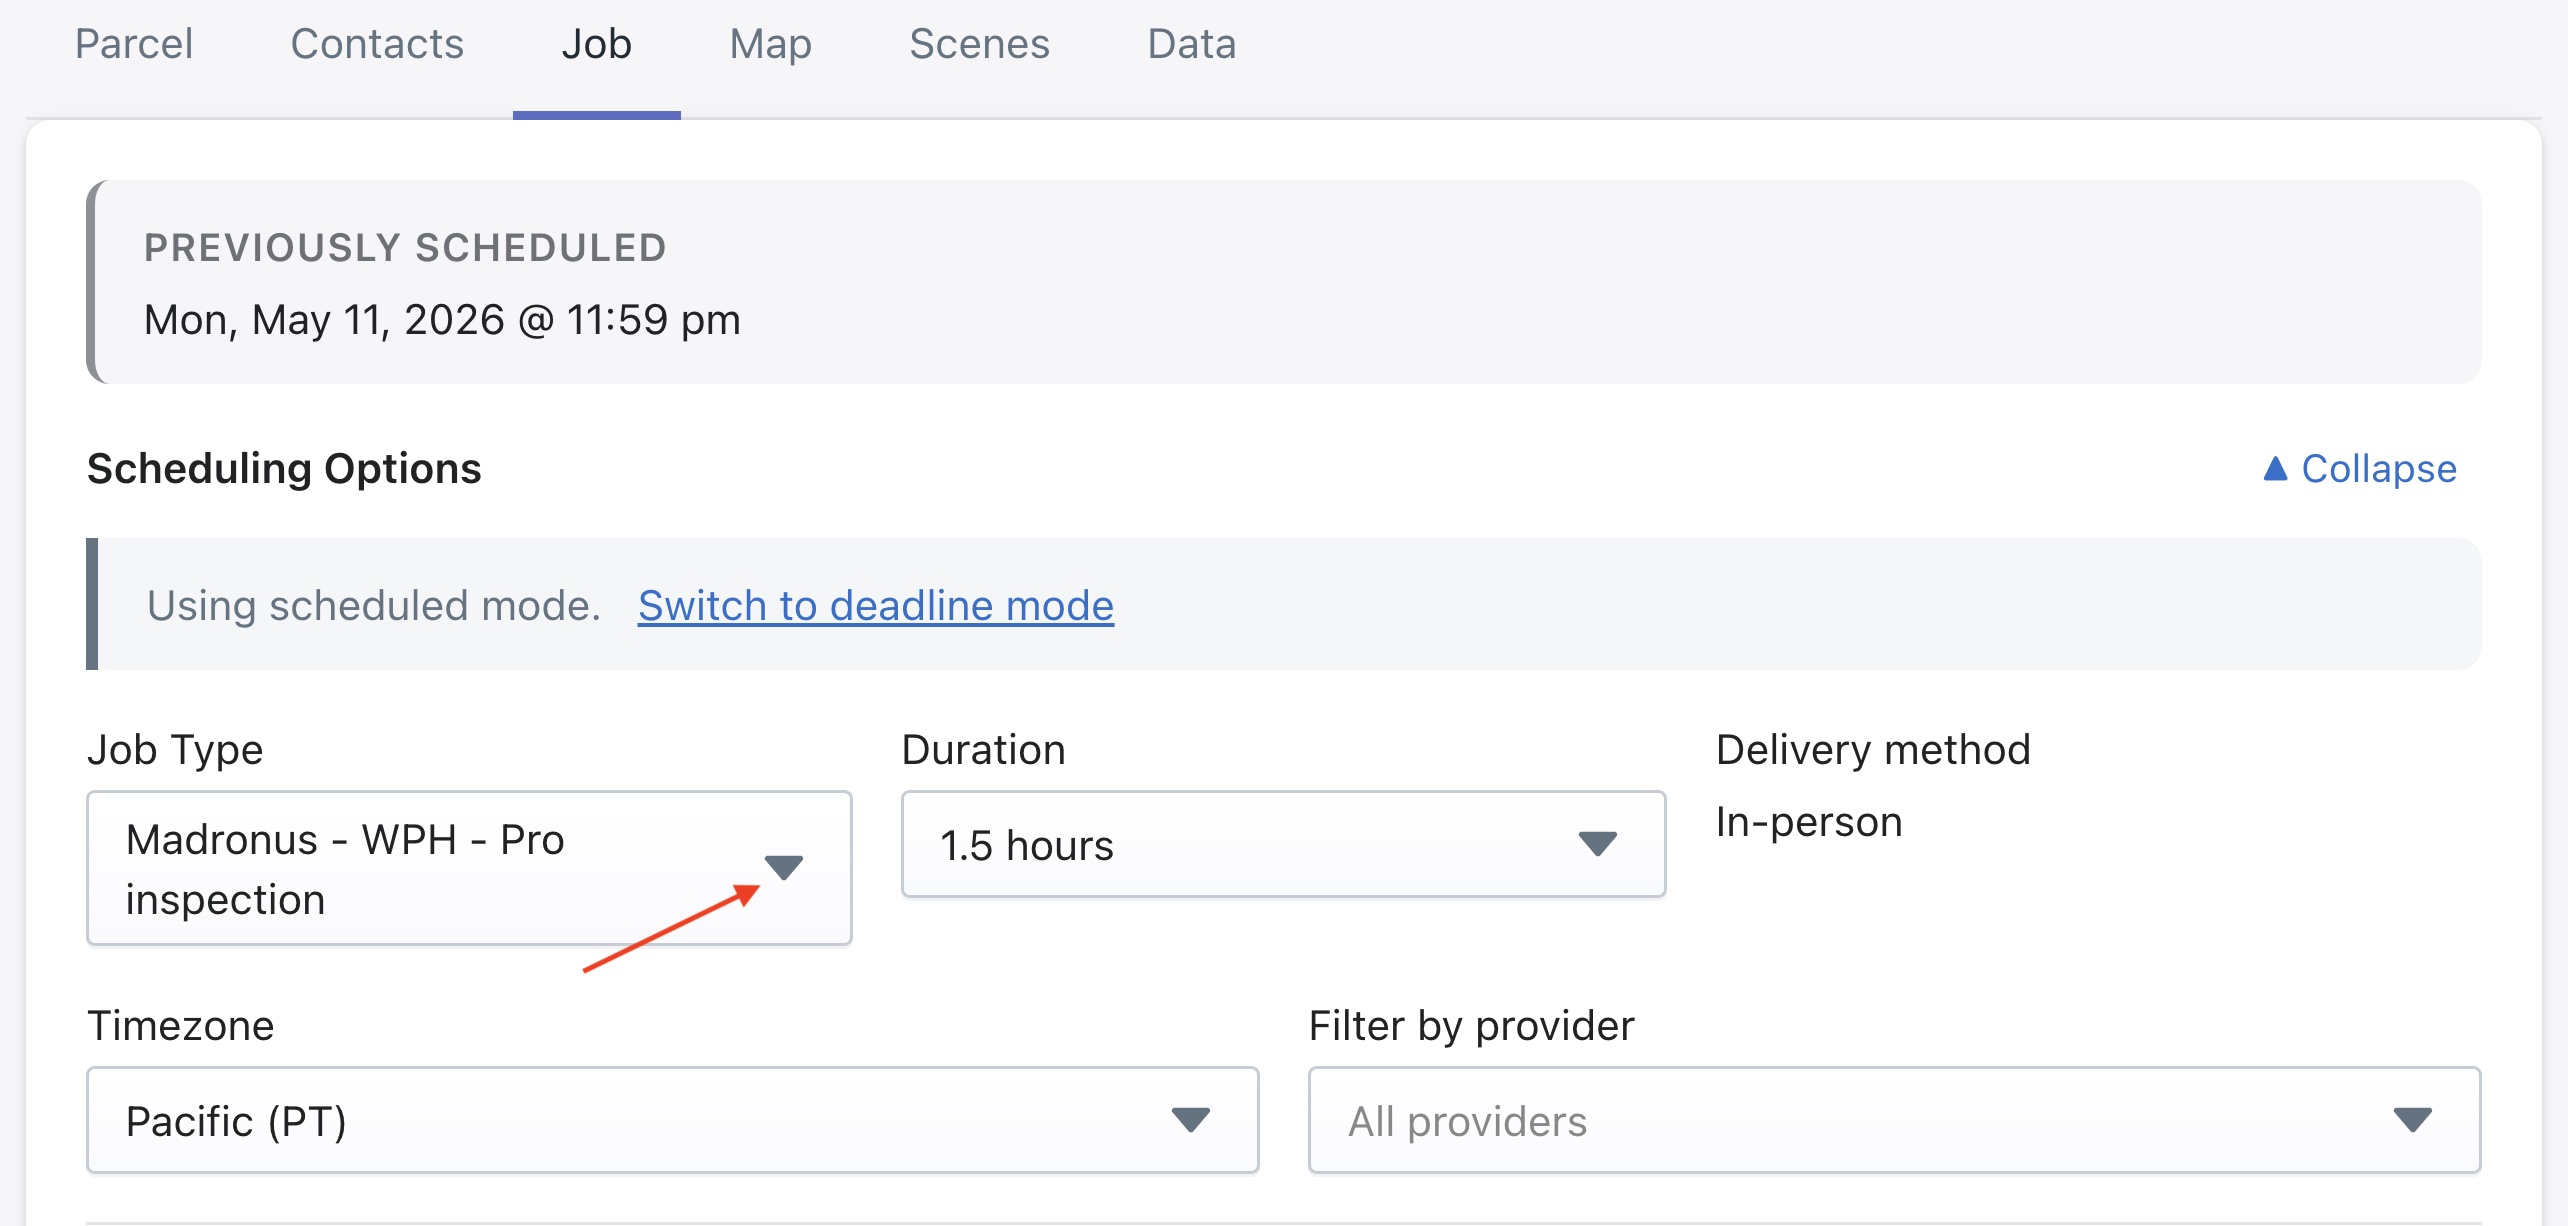
The scheduling feature will automatically identify the available time slots for scheduling a job taking into account the drive time with traffic, the maximum drive time settings for users and their working hours. It will also take into account the duration of the job that is configured for the particular job type. This duration can be modified using the section shown above.
Click here to learn more about Job Types.
The Schedule Job manually feature can be used if automatic assignments of jobs to assessors has not been configured in the system or the user wishes to override the automatic scheduling system.
For example if the job is being created with less than 24 hours notice but the user is aware of an assessor scheduled to be near this job site during a certain time period. This feature also overrides the assessor's personal availability hours, allowing for more flexible and customizable job assignments.
The timezone, service provider (assessor), date and time can be set using this dialog box -
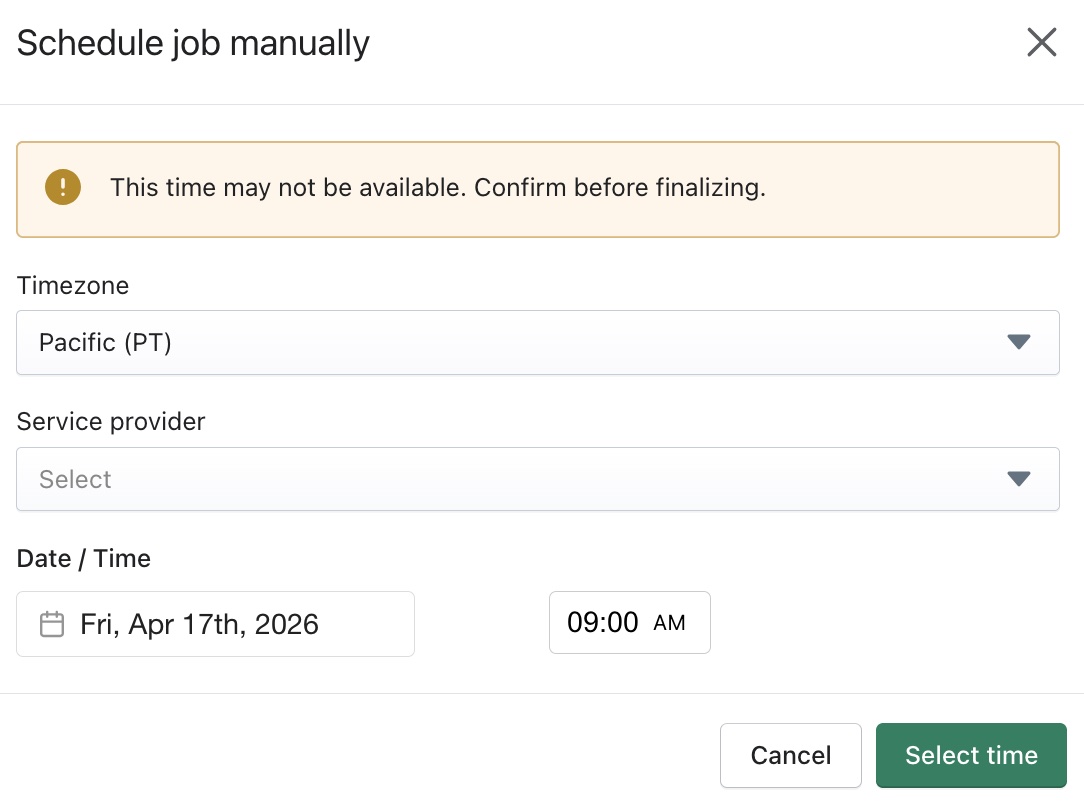
Click Schedule to submit this selection.
Please Note
Clicking on Schedule is required or else the job will not be sent to the assessor, nor will it appear on their Collect App.
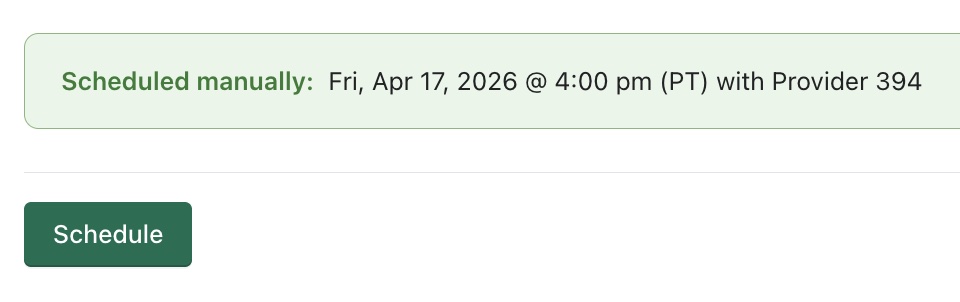
The status of the job is now set to Reserved. The assessor will receive an email with the job details and a link to accept the job.
Some other fields on this tab are -
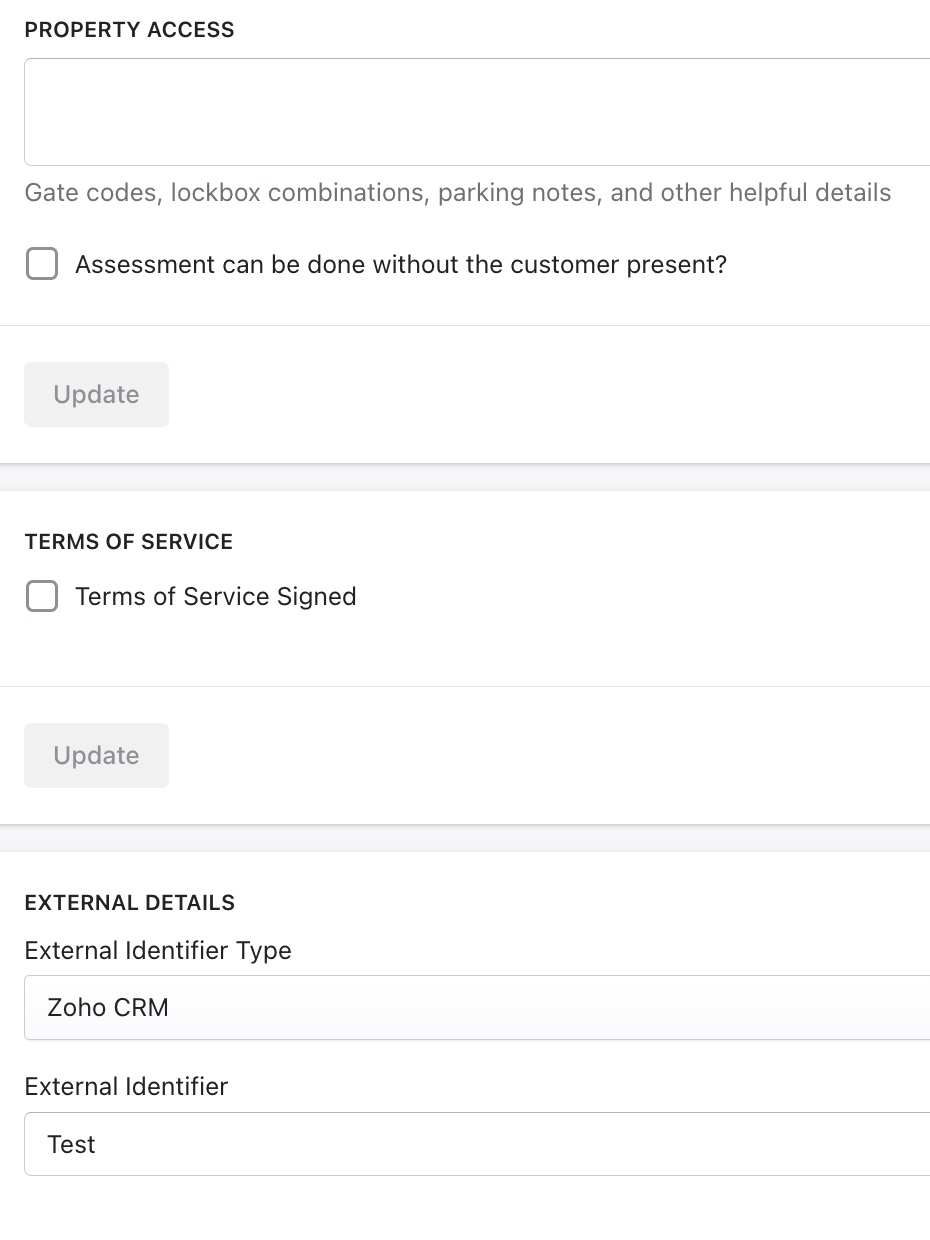
- Property Access - Specify details for accessing this property like access code, parking directions, animals present, etc. and whether the assessment can be conducted without the customer present
- Terms of Service - Check this box if terms have been accepted
- External Details - Could specify policy number, etc
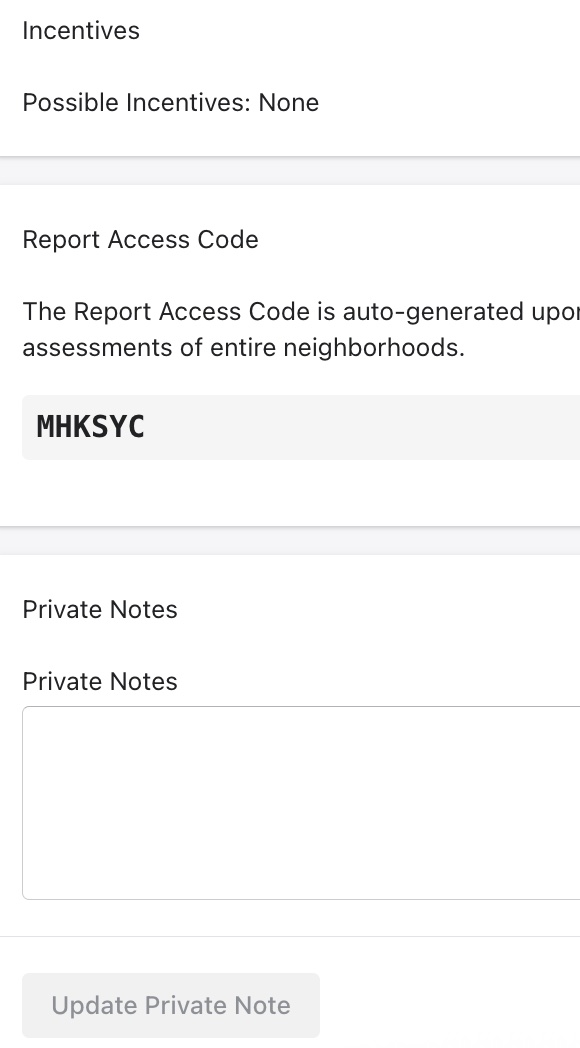
- Incentives - Any incentives configured in the system will appear here
- Report Access Code - The Report Access Code is auto-generated upon assessment creation and cannot be edited. It allows for a user to access their report and is primarily used by organizations eg. a fire agency that conducts bulk assessments of entire neighborhoods.
- Private Notes - Any additional notes can be added here
Map
The Map tab can be used to view and update structures associated with a property.

Users can click on the Map layers icon (first icon) on the top right corner of the map view to enable or disable more map layers. For example the "Fires" layer can be turned on to show fire history data.
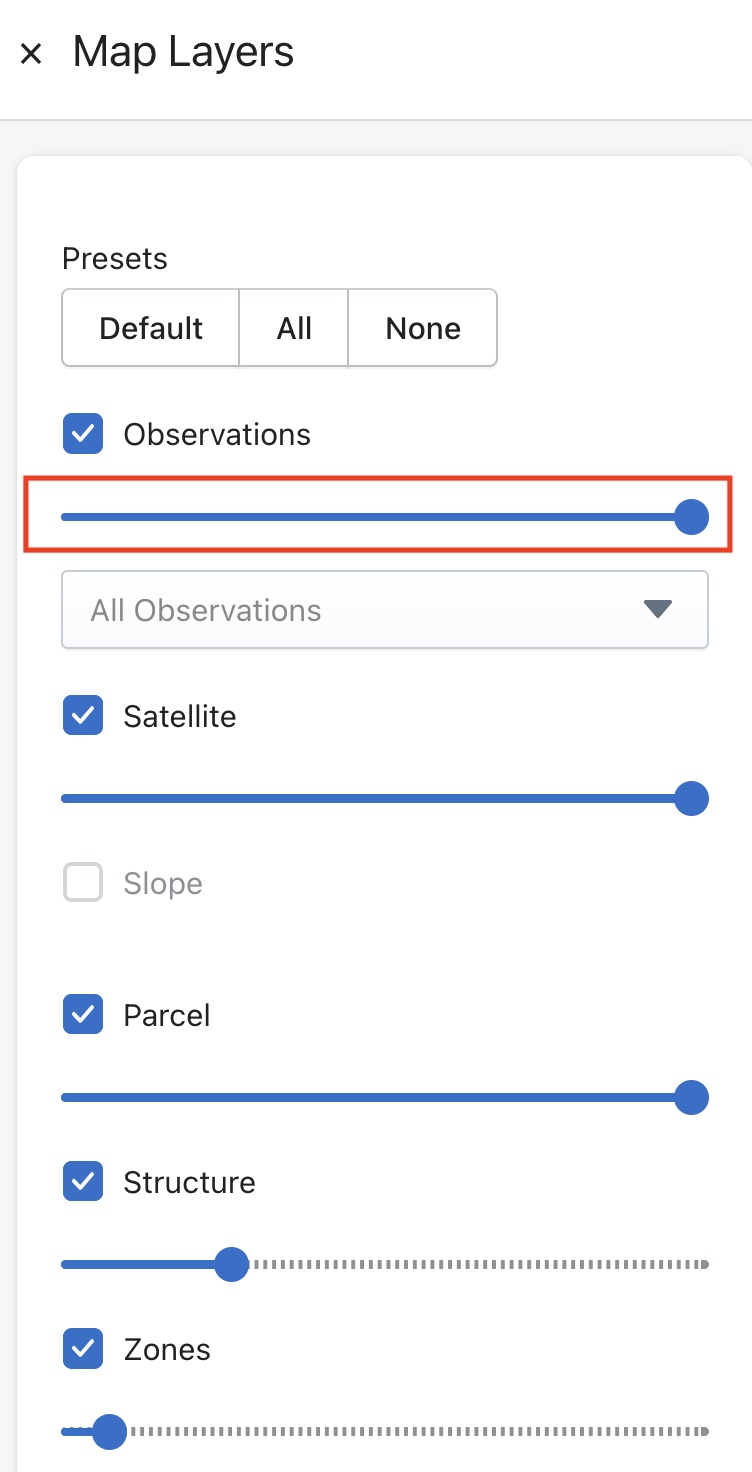
Additionally, the opacity of a layer can be adjusted
with the slider highlighted here -
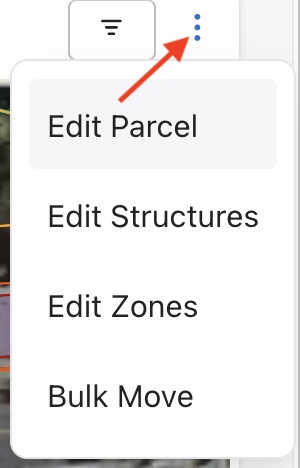 The second icon can be used to modify various map
 features like parcel, structure and zones -
Click on Edit Structures to modify a structure directly on the map. Users can move it around and adjust its boundaries - this is useful to add a patio for example that might be missing.
Use the Create Polygon icon on the top right corner of the map to add a custom structure.
Once the structure has been updated, the system will reevaluate the structure info. Once this process is completed, the assessment will be ready for further work.
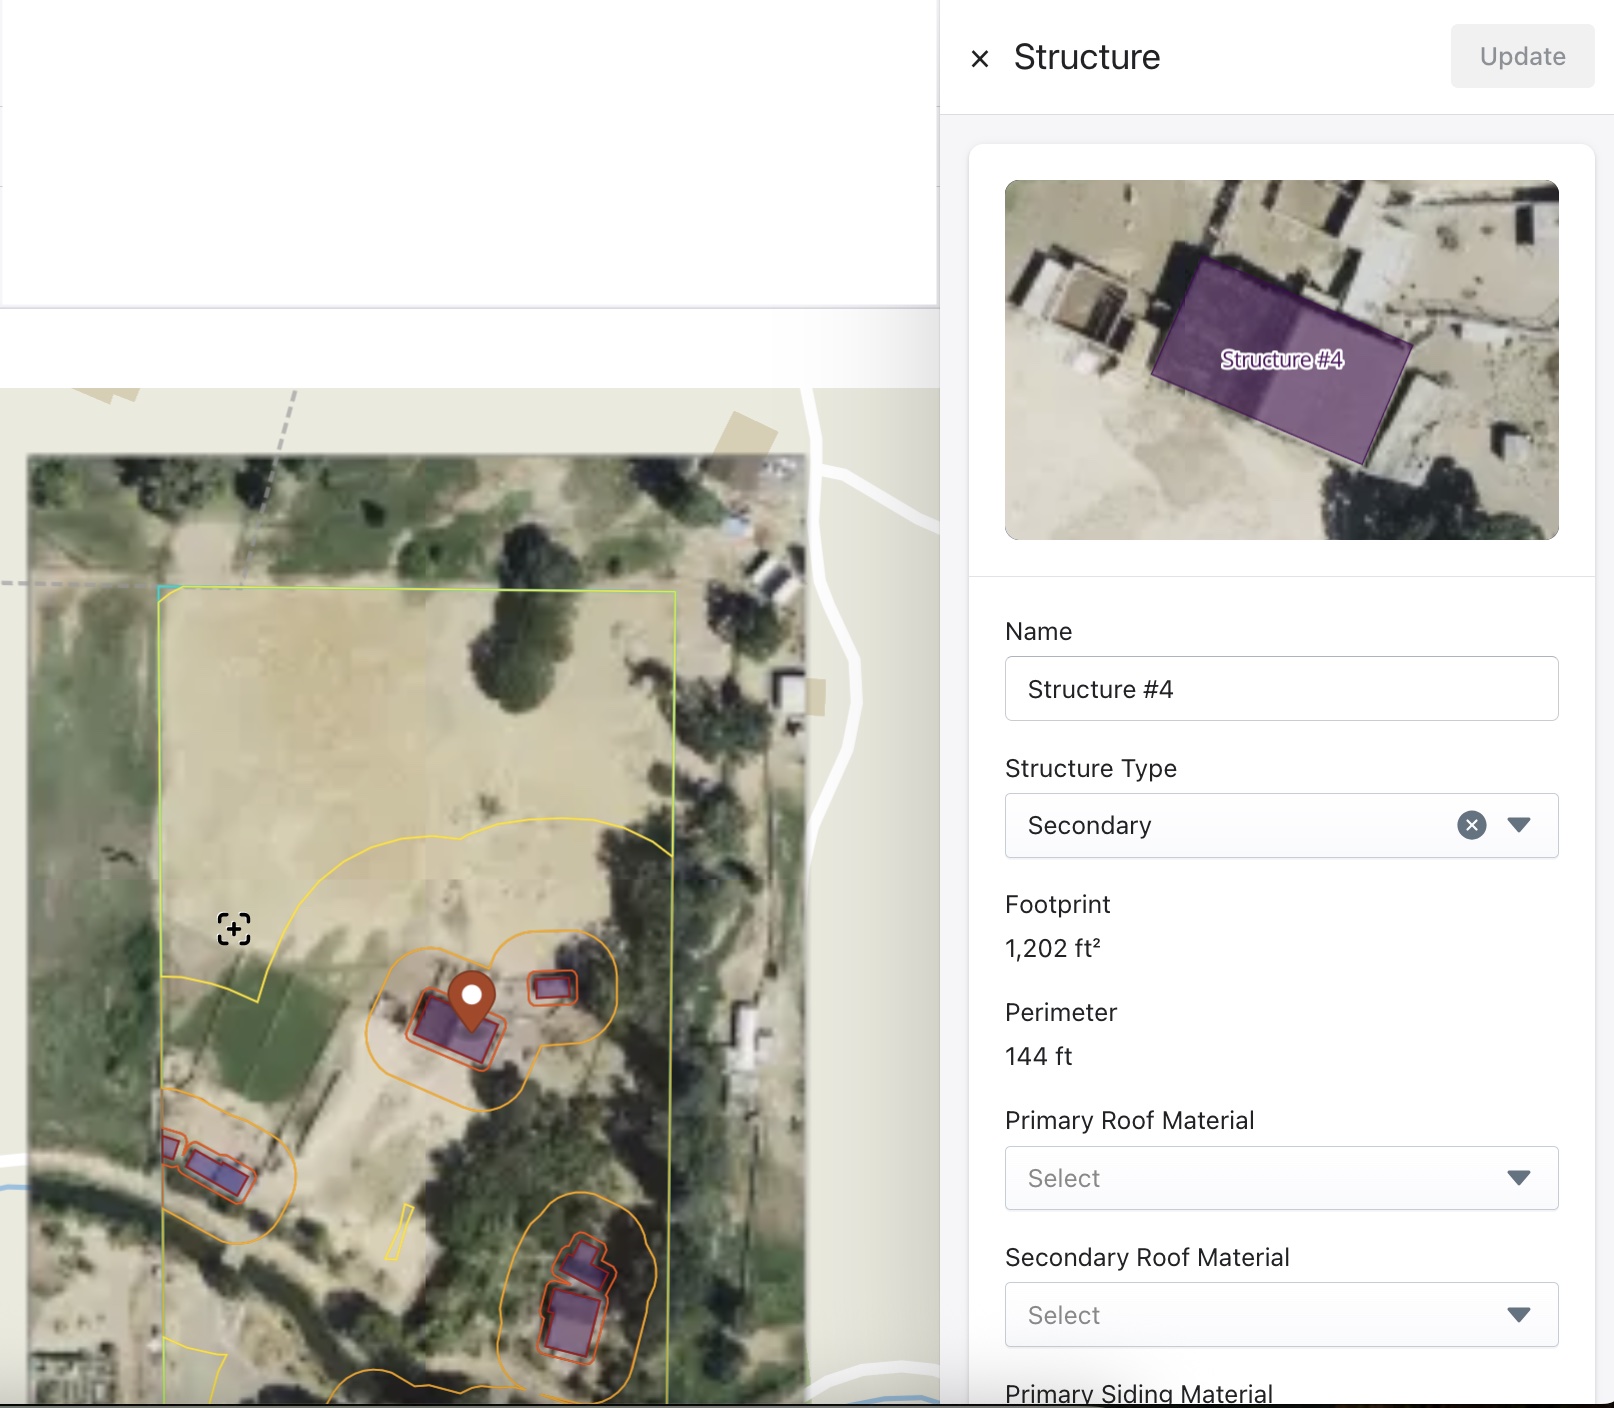
The Structure dialog box appears when a structure is selected (not in edit view) and it displays detailed information about that specific structure and allows administrators to review and update its attributes.
For example the classification of a structure on the property could be updated to be either -
- Primary — The main building on the parcel, typically the residence or dwelling. These structures are typically covered under Coverage A for most insurance policies.
- Secondary — An additional structure on the property such as a garage, shed or guest house. These structures are typically Coverage B structures.
Observations
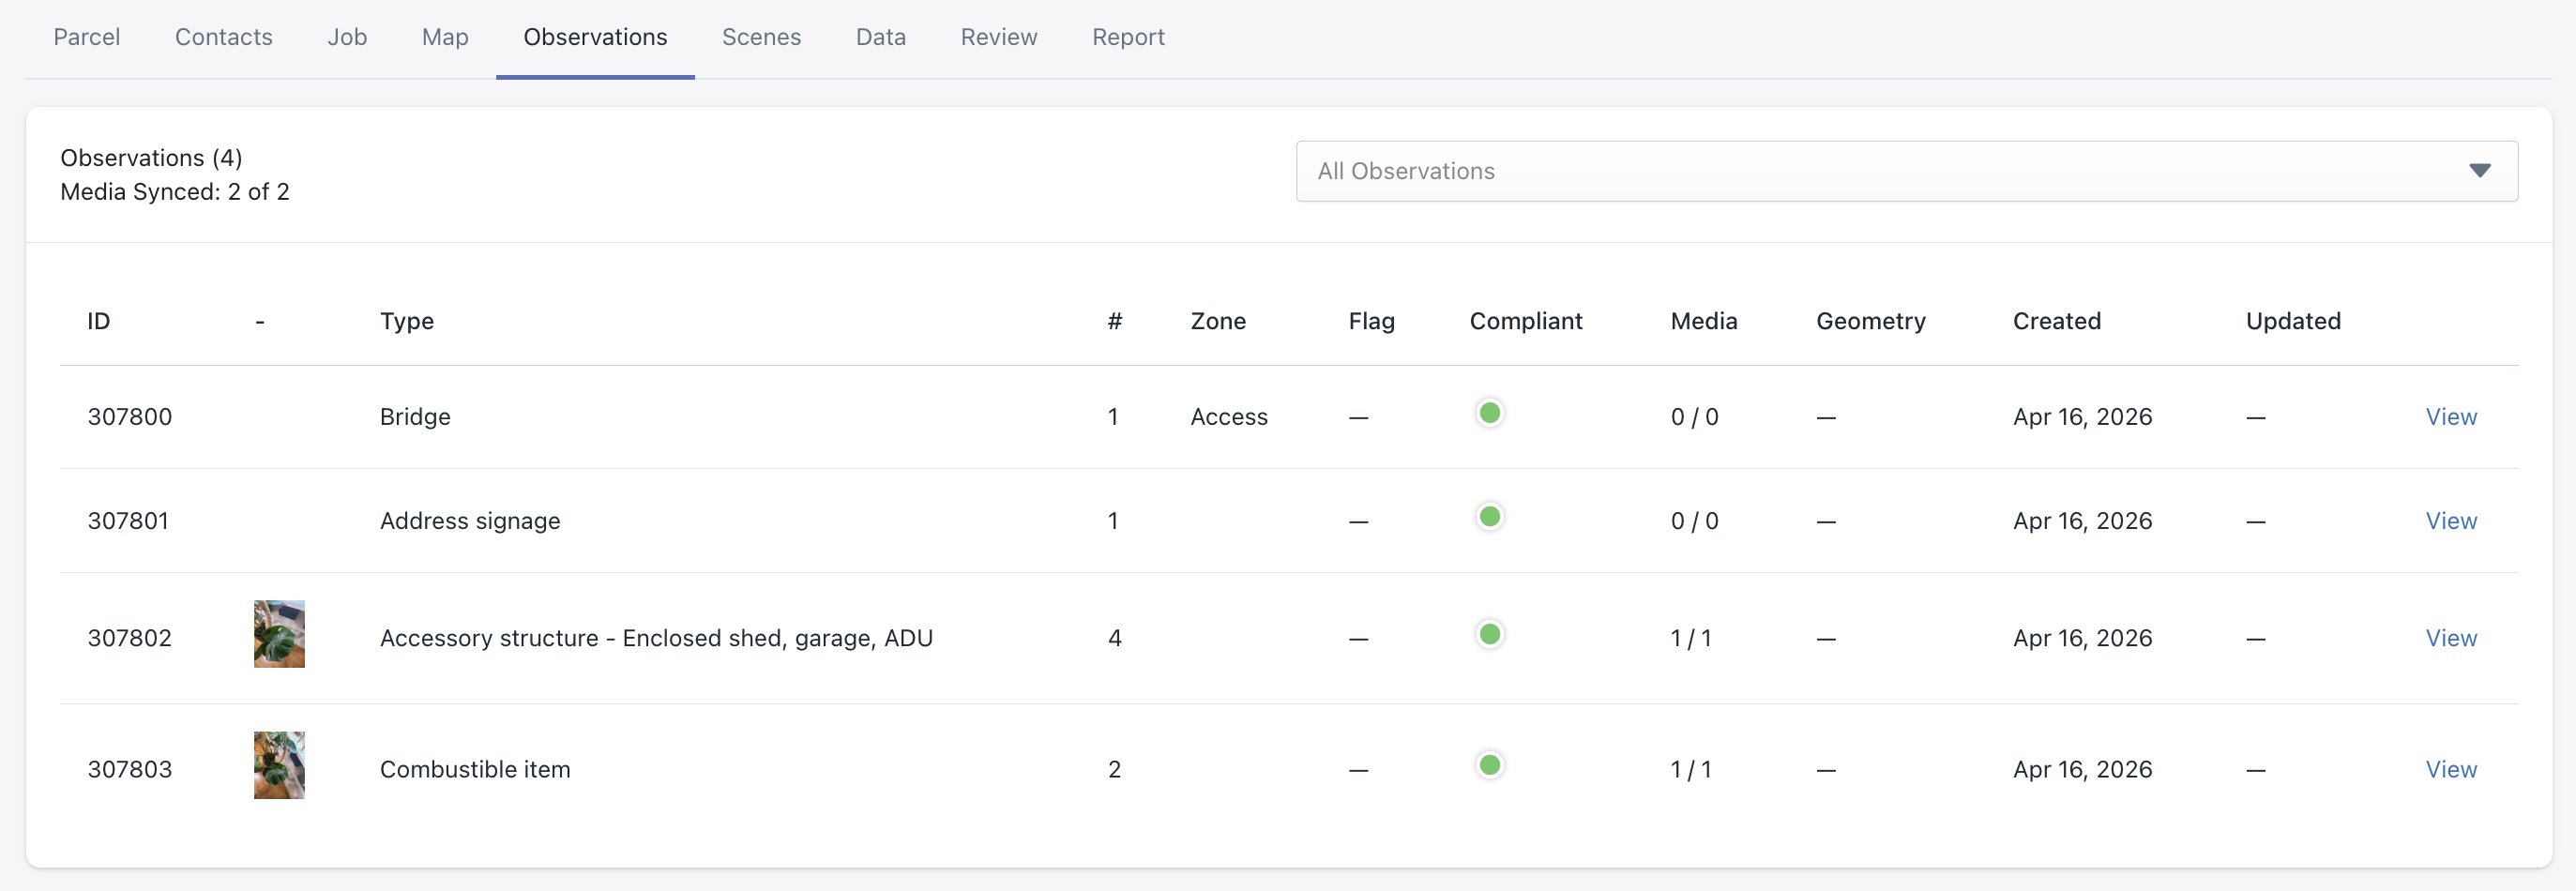
The Observations tab displays all observations made during the assessment. Each observation represents a specific item or condition captured by the assessor — such as trees, shrubs, accessory structures, windows, doors or combustible items. Click on View to see more details for each record.
Data
The Data tab provides access to the underlying geographic and map data associated with the assessment. This is primarily used for technical review, data exports and verifying the map layers used during the assessment.
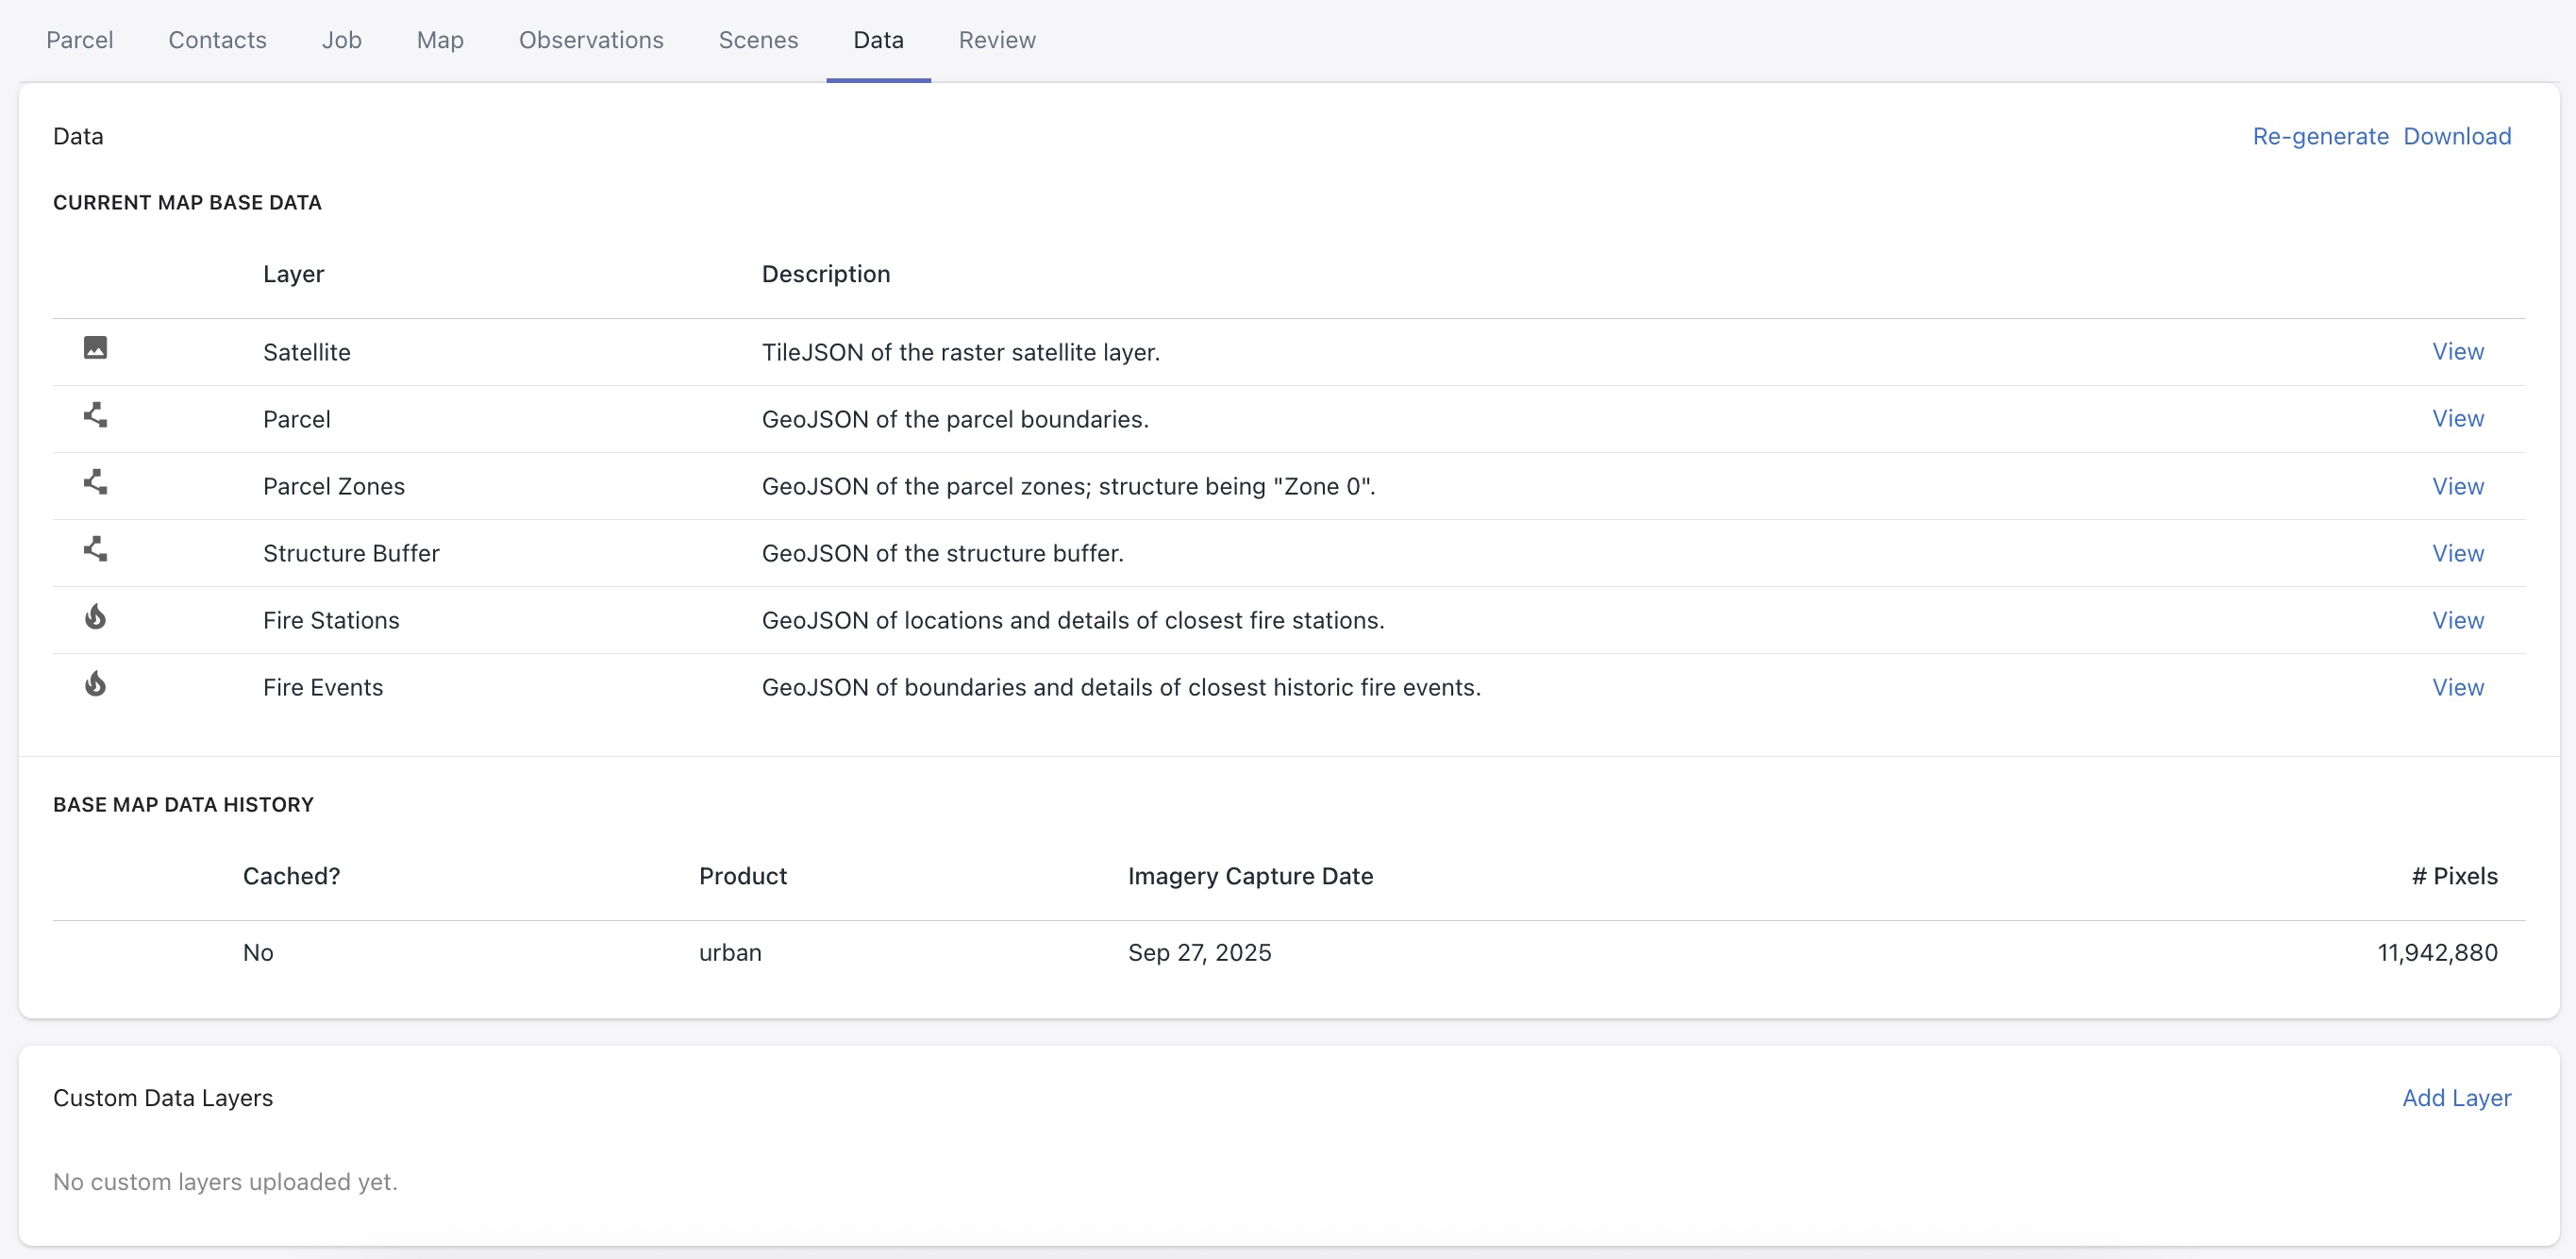
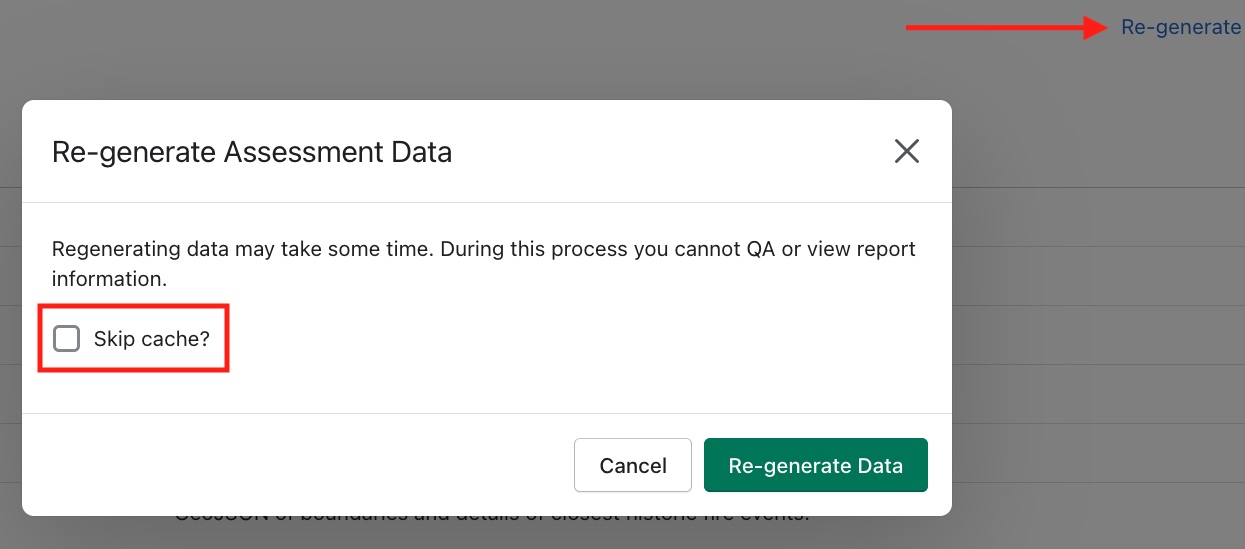
Users can click on Re-generate (top right corner of the view) to regenerate the data package or Download.
The Re-generate feature can be used to recreate the data package in cases where the job is stuck, or there might be new data available. Skip cache? will force the system to ignore the previously obtained data and acquire new data containing the latest imagery.
Download allows the user to export assessment data and related media from the system.
There are options available when user selects Download -
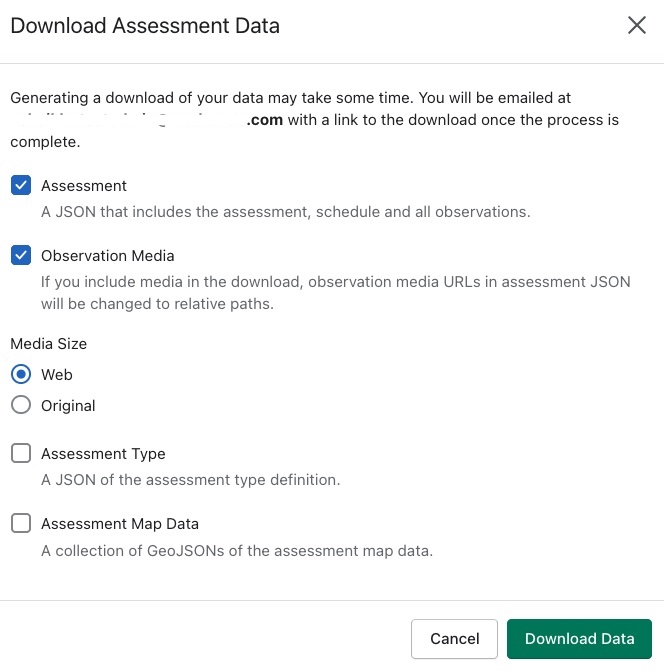
- Assessment - Includes a JSON file containing the full assessment, its schedule and all associated observations.
- Observation Media - Includes media files attached to observations.
- Media Size - Select Web for smaller file sizes and faster download; Select Original for full resolution original media files.
- Assessment Type - Includes a JSON file containing the assessment type definition.
- Assessment Map Data - Includes two sub-options -
- Include Satellite TMS imagery - will include satellite imagery of the earth
- Include Slope TMS imagery - includes map layer that visually represents the steepness of terrain.
After pressing Download, the data package will be prepared. Access Notifications menu to complete the process. The file will be saved as a ZIP to the device. The user will also be emailed a link to download the file.
Review
The Review tab allows users to review, edit and update observations and treatments before generating a report. This can be used by admins to ensure quality control across a team and to check work.
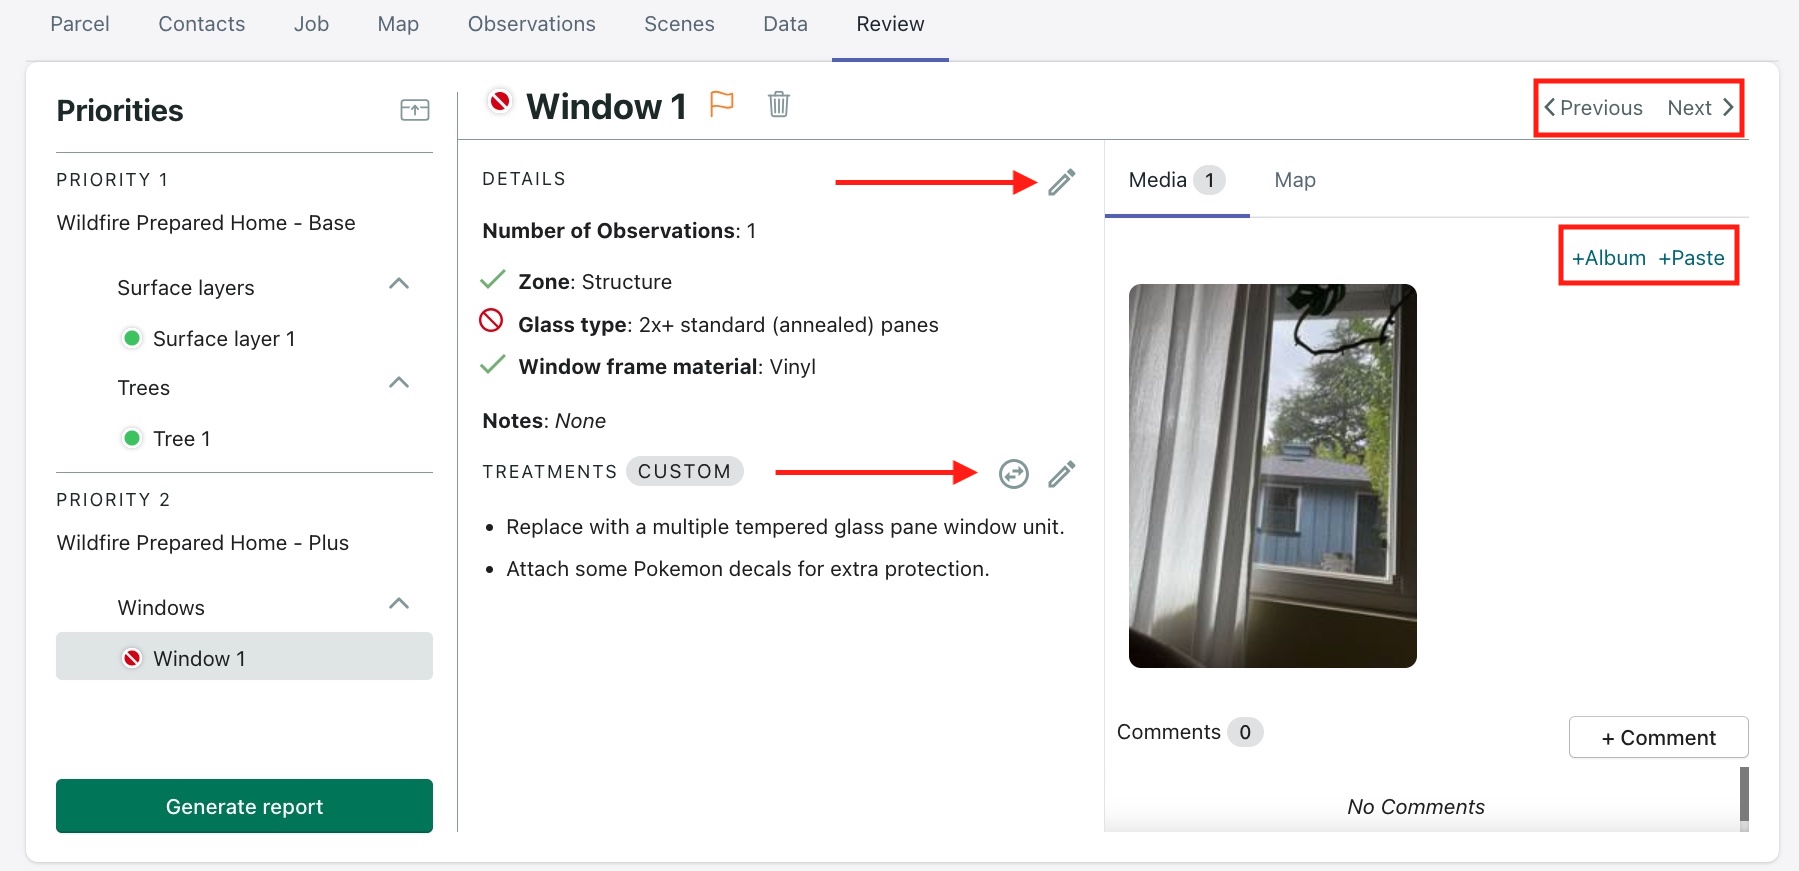
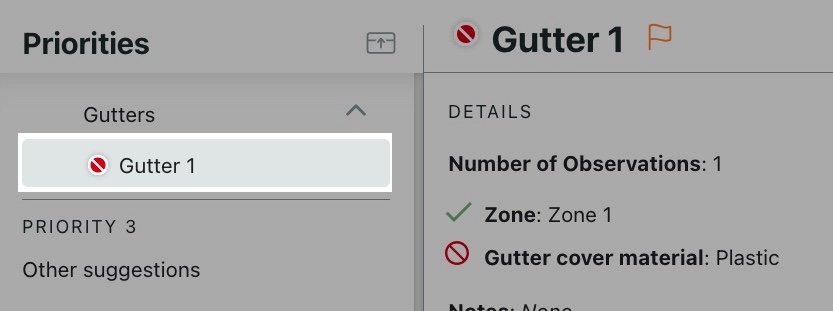
Priorities panel (left sidebar) - Displays observations grouped by Priority level e.g., Priority 1, Priority 2.
Use Previous and Next (top-right) to move between observations. Observations can be edited using the pencil icon highlighted next to the Details section.
The Flag and Delete icons next to observation name can be used to set or remove flags on an observation and delete an observation, respectively.
Using the +Album button, a user can upload photos. The +Paste button can be used to paste photos that have been copied to clipboard.
Use +Comment to add comments to each observation. Multiple users can collaborate on the review by adding comments. The assessor, for example, will receive an email with this update along with any other users who have commented and the team can review and resolve any questions or discrepancies.
Please Note
If an observation has a flag, or if there are any warnings they will need to be resolved before a report can be generated.
Treatments
All observations will have treatments populated based on the Assessment type. They can also be customized on each observation to cover unique situations and edge cases.
If a treatment has been recommended for an observation, it can be modified as well in the Treatments section. There are two types of treatments, Default and Custom.
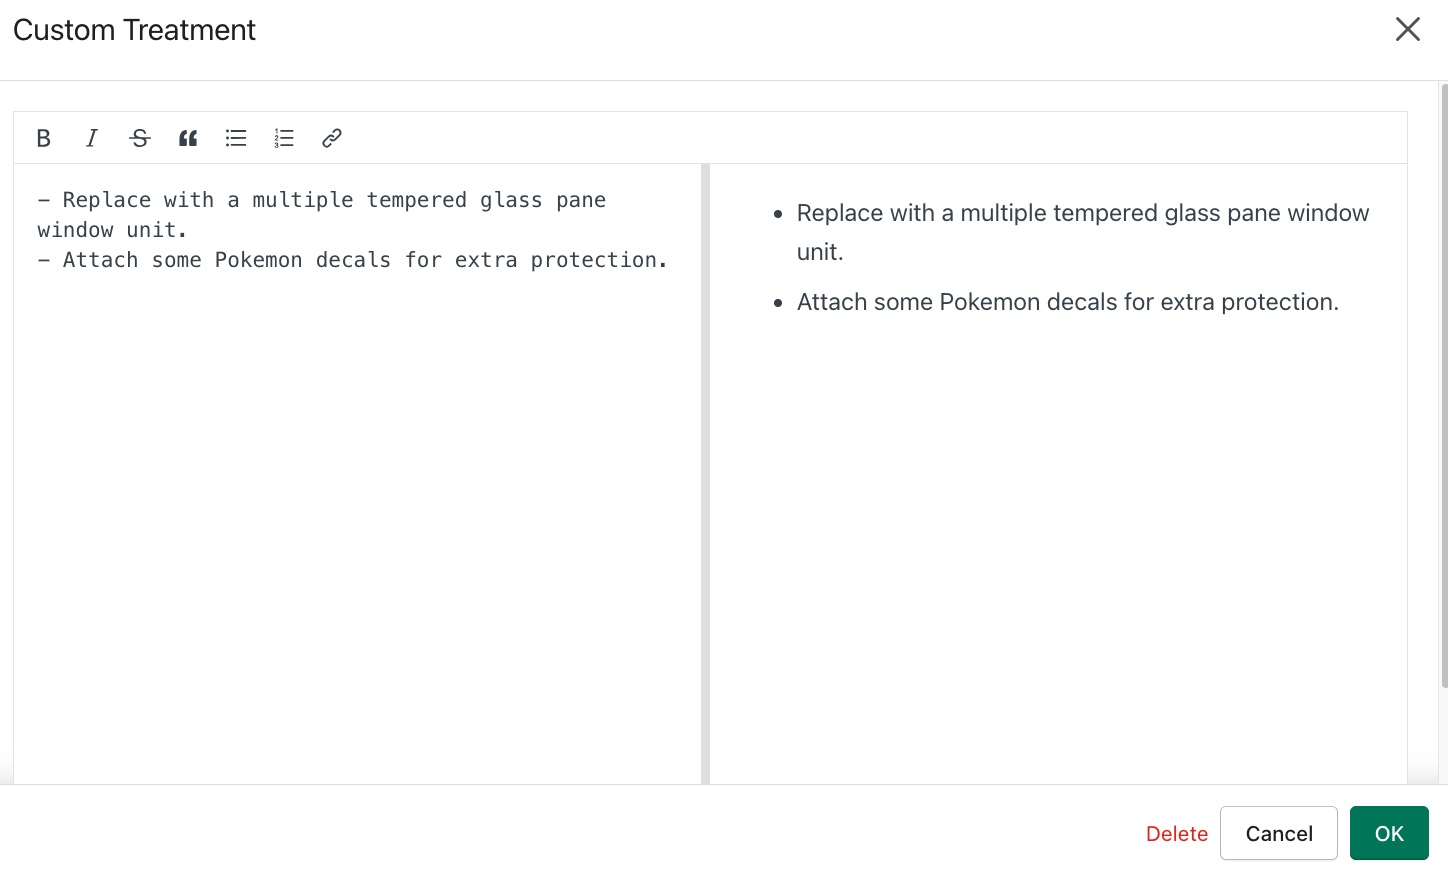
If a custom treatment has been chosen for an observation, like in the example above, the two arrows icon can be used to switch to the default treatment instead.
Use the pencil icon to update the custom treatment. A Markdown text editor loads with formatting options: bold, italics, bullet and numbered lists, links, etc. The left panel shows the editable content and right panel shows preview of formatted output.
Click Generate report when all observations have been reviewed. This will indicate that the assessment is now at the Report Complete step. The report is generated and all assessment data will be removed from assessor devices that were used to do the assessment to free up storage.
Report
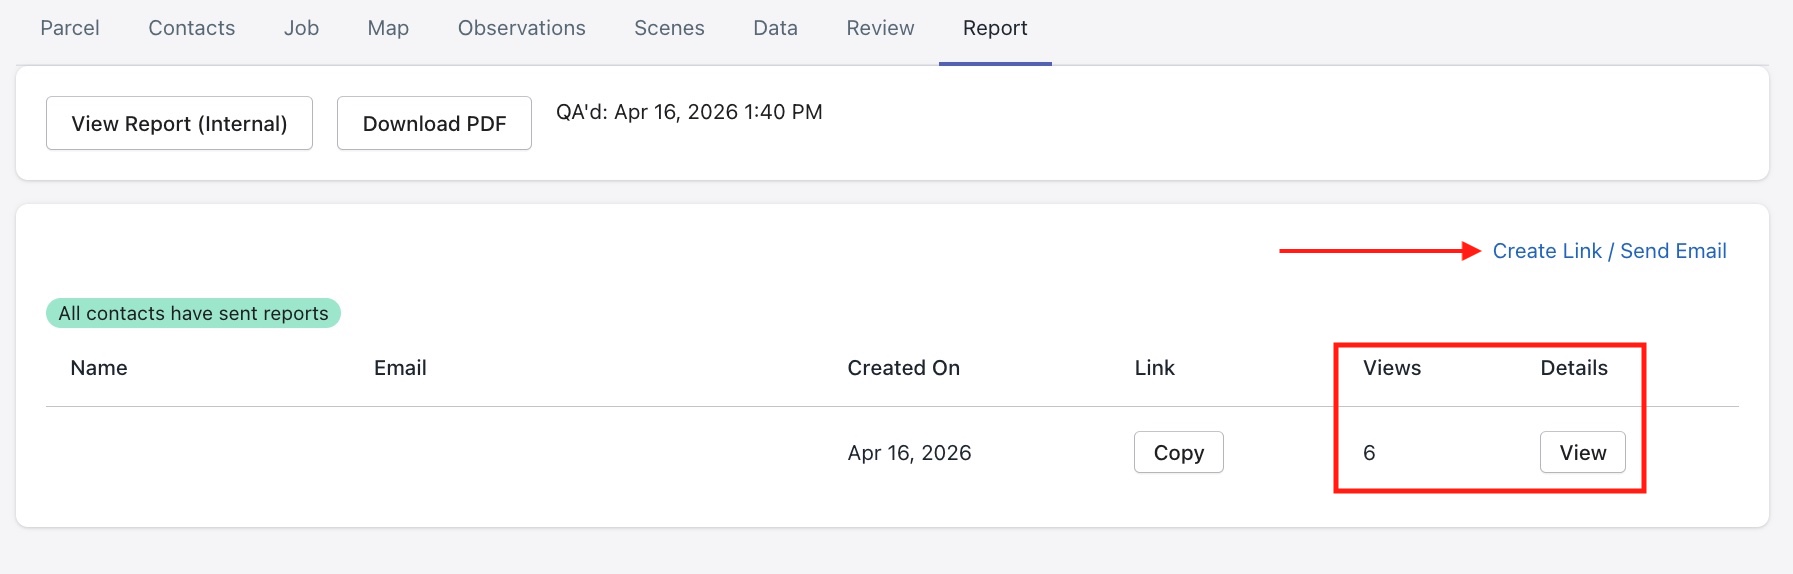
The Report tab allows users to view, download and share the final assessment report.
In the contact list section, against each contact, the admins are able to view -
- Views – Number of times the report has been viewed by the contact
- Details – Shows which pages the contact has viewed
Create Link / Send Email button - Generate a shareable link to the report and email the report directly to all contacts associated with the assessment.
Important
Do not share these report links outside of your organization for security purposes.
View Report (Internal) button can be used to review the report before it is sent to customers. If the reviewer finds any issues with the report, they can use the Administration menu - Send Back to Review feature to correct these.
Please Note
If the assessment is sent back for review and the report is regenerated, the link shared with contacts does not need to be resent. The original link will automatically update with the latest version of the report.
Download PDF button - Downloads the finalized report as a PDF file. Some options available for download are -
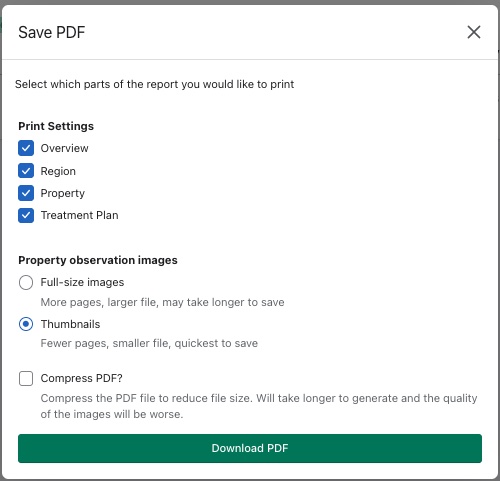
Use Compress PDF? for image-heavy reports to enable easier email sharing.
Administration
On the top right corner of the assessment window, the Administration menu gives the user access to advanced actions for managing an assessment. Please note this feature may be disabled based on your profile settings. Contact your system admin or the Wuuii team for assistance.
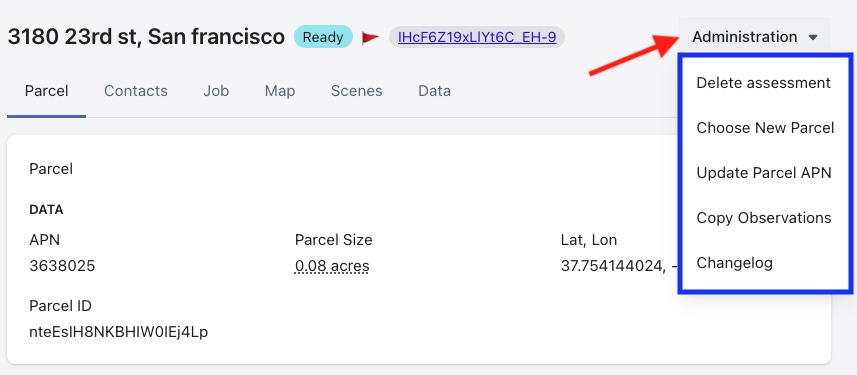
- Delete Assessment - Permanently removes the assessment from the system.
- Choose New Parcel - Reassigns the assessment to a different parcel. Use this option if the wrong parcel was initially selected.
- Update Parcel APN - Allows updating the Assessor Parcel Number (APN) associated with the assessment.
- Copy Observations - Copies all observations from current assessment to an existing assessment in the system.
This feature is useful in the following scenarios -
- Jobs associated with the same Home Owners Association
- Community where common area features were assessed and a single report needs to be presented
- Job was mistakenly created and is now being managed in another assessment
- Two different people working the same site and the two jobs now need to be combined into one
- Changelog - Displays a history of changes made to the assessment.
Some other options available in this menu based on the status of an assessment are -
- Start Assessment - Allows users to add observations and upload media directly from their machine, as if conducting the assessment in the field. This is useful for remote assessments or when additional media needs to be added after an assessment has been completed.
- End Assessment - Once all observations have been added, end assessment to move it forward to review stage.
- Send Back to Scheduling - Moves the assessment back to the scheduling stage so it can be rescheduled or reassigned.
- Send Back to Review - Returns the assessment to the review stage for further evaluation of observations and treatments before proceeding.